Graphwise - HubSpot Automation Integration
Handles HubSpot form integration, category interest tracking, and course-completion certificate automation.
Install
This is the repository archive. It installs, but the folder name will carry the branch suffix and updates will not flow.
Install straight from GitHub with WP-CLI:
wp plugin install https://github.com/mnestorov/graphwise-hubspot-automation-itegration/archive/refs/heads/main.zipThe Graphwise - HubSpot Automation Integration plugin is a powerful all-in-one solution that connects your WordPress site with HubSpot and other external systems for:
- Displaying submitted user information on a personalized Thank You page
- Tracking visitor interest in your WordPress categories
- Receiving webhooks from an Academy system, updating contacts in HubSpot, and triggering a Certificate API
This plugin requires no coding skills. All you need is a WordPress website, a HubSpot account, and a few basic setup steps.
Plugin Features
1. Personalized Thank You Page
When a visitor fills out a HubSpot form on your WordPress site, they are redirected to a "Thank You" page where their first name, last name, and email are displayed dynamically.
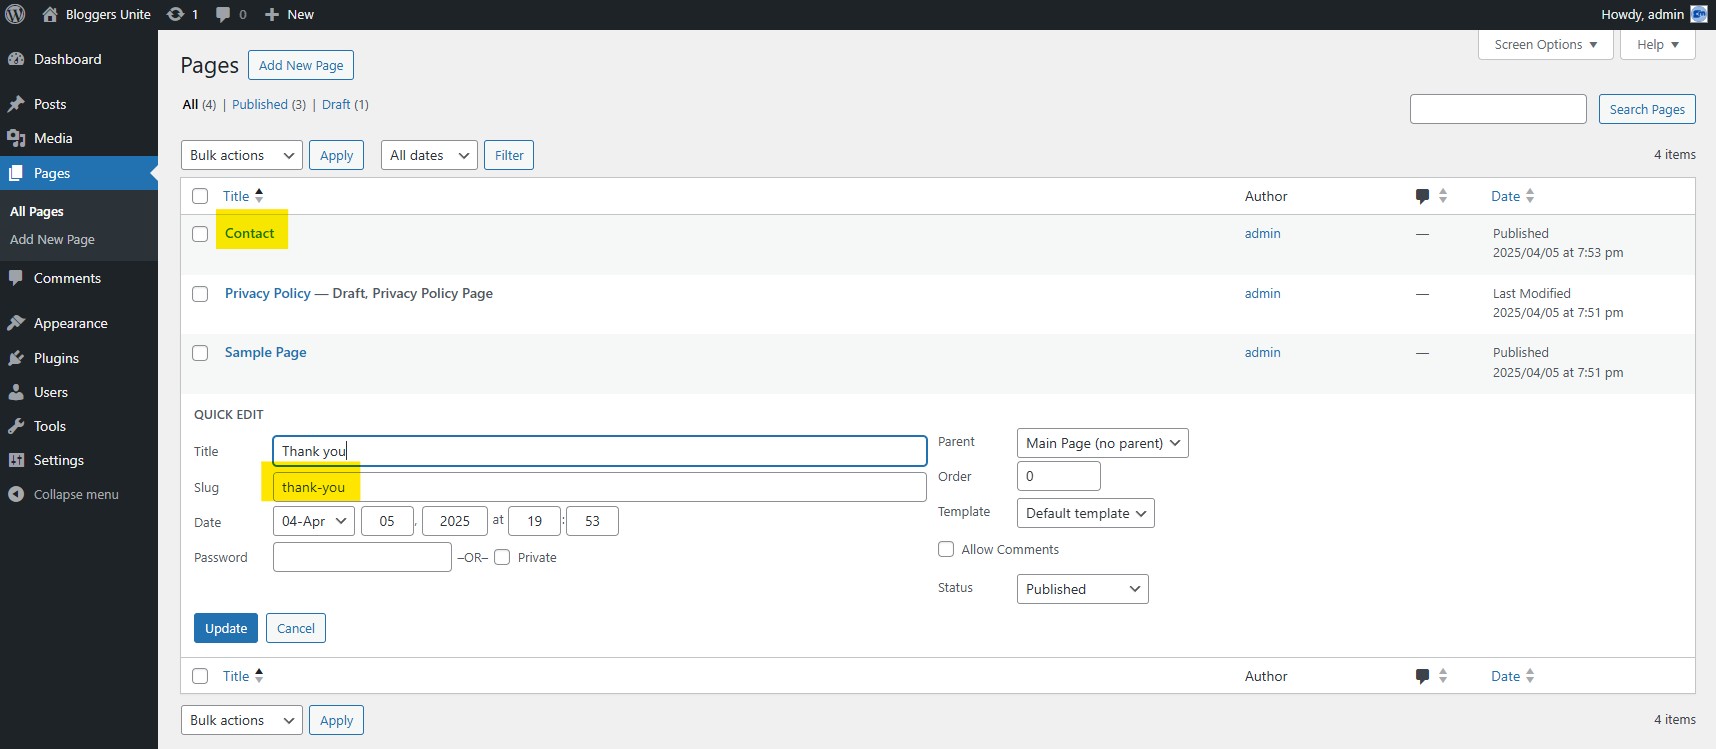
- The slug of the Thank You page (e.g.,
/thank-you) is configurable in the plugin settings. - The Thank You message is inserted into the page content using the
[thank_you_message]shortcode, allowing you to control its placement.
2. Category Interest Tracking
The plugin keeps track of which content categories a visitor views. When the user fills out the HubSpot form, their interest in different topics is sent to HubSpot using hidden fields.
- Tracks categories when a visitor views single posts or category archive pages.
- Stores category visit counts in the browser's
localStorage. - Adds hidden fields (e.g.,
interest_email_marketing) to the HubSpot form with the number of visits to each category. - Allows you to better understand what your leads care about directly inside HubSpot.
3. Course Completion Integration (Webhook Support)
When a user completes a course in an external Academy platform, it sends a webhook to your WordPress site:
- The contact’s record in HubSpot is updated with the latest course completed (stored in the
latest_completed_courseproperty). - A Certificate API is triggered to issue their course completion certificate.
4. Organized Code with Separate JavaScript Files
- JavaScript code is organized into separate files (
footer-scripts.jsfor category tracking and Thank You page logic,hubspot-tracker.jsfor HubSpot form integration). - Scripts are properly enqueued using WordPress best practices (
wp_enqueue_script). - Dynamic data (e.g., category slugs, HubSpot Portal ID, and Form ID) is passed to the scripts using
wp_localize_script.
How to Set It Up
Prerequisites
- A working WordPress website.
- Access to your HubSpot account.
- A HubSpot form with redirect to a Thank You page.
- Optionally: an external Academy system that can send webhooks.
Set Up in WordPress
1. Install the Plugin
- Log in to your WordPress admin dashboard.
- Go to Plugins > Add New > Upload Plugin.
- Upload the plugin ZIP file:
graphwise-hubspot-automation-integration.zip. - Click Activate Plugin.
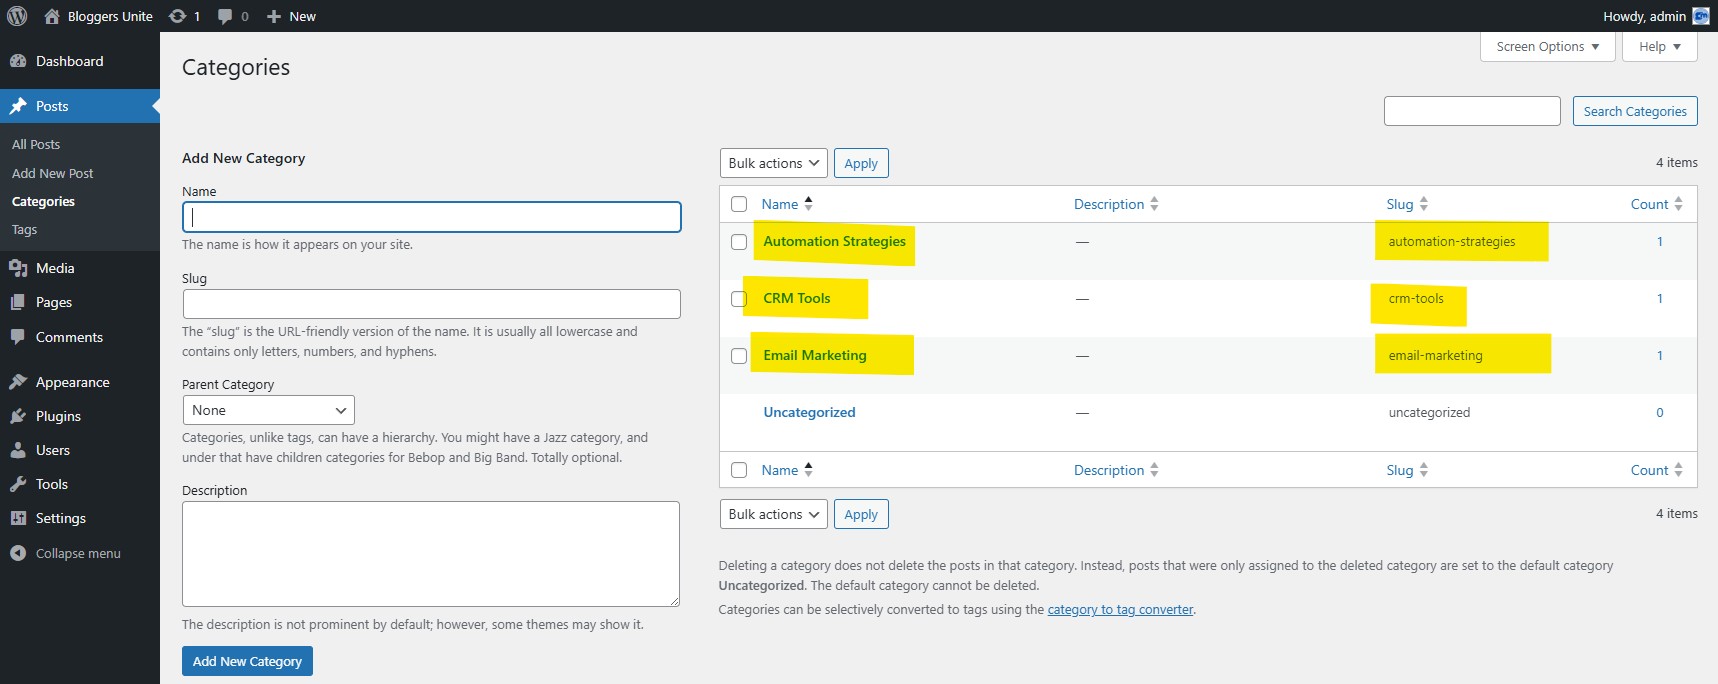
2. Create Categories (for Interest Tracking)
- Go to Posts > Categories.
- Create at least 3 categories that match topics you write about, like:
email-marketingcrm-toolsautomation-strategies
- These category slugs (e.g.,
email-marketing) will be used as the keys to track visitor interests (e.g.,interest_email_marketingin HubSpot). - Important: Make sure your blog posts are assigned to these categories so the plugin can track what users are reading.
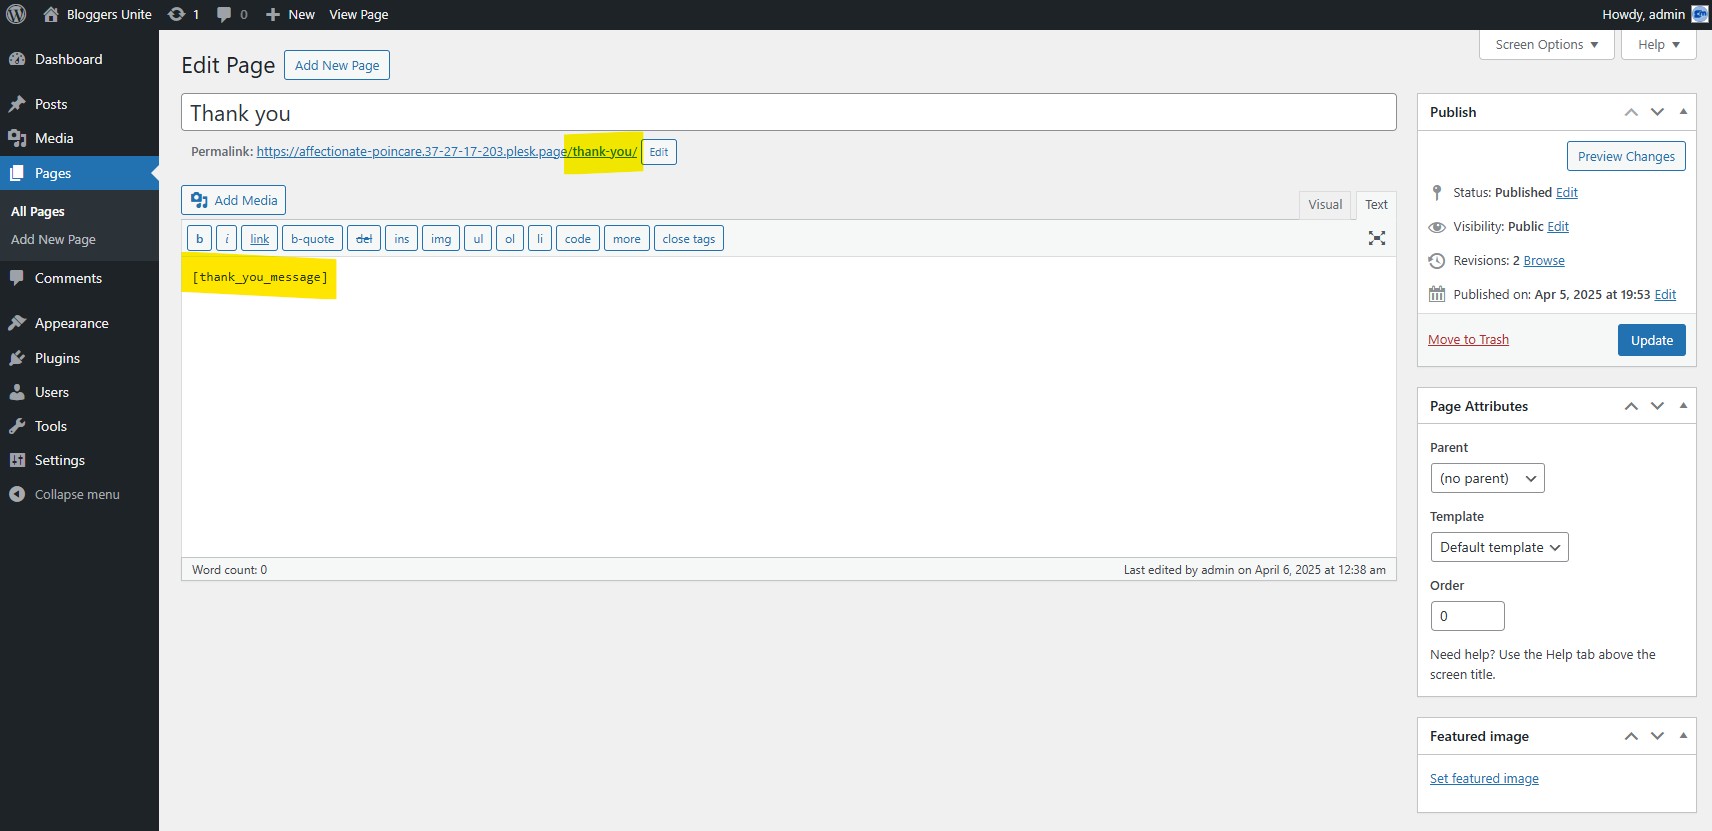
3. Create the Thank You Page
- Go to Pages > Add New.
- Title it:
Thank You(or another title, but note the slug, e.g.,thank-you). - In the content editor, add the following shortcode where you want the Thank You message to appear:
[thank_you_message]
- Publish the page.
Note: The page slug (e.g., thank-you) as you’ll need to configure it in the plugin settings.
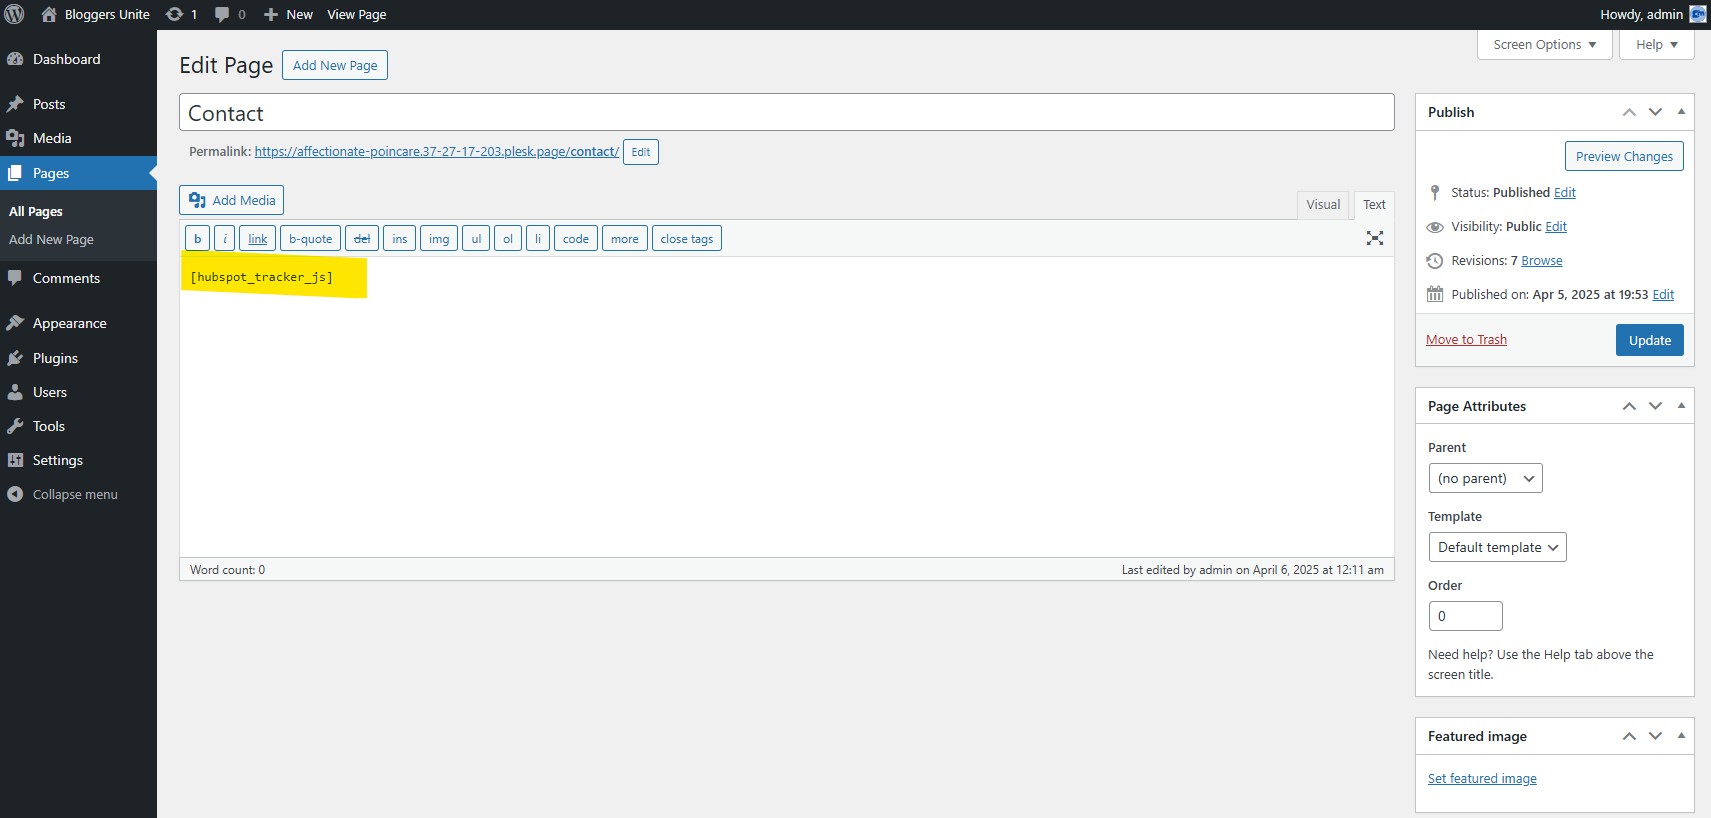
4. Create the Contact Page (with HubSpot Form)
- Go to Pages > Add New
- Title it:
Contact - In the content editor, add:
[hubspot_tracker_js]- Publish the page.
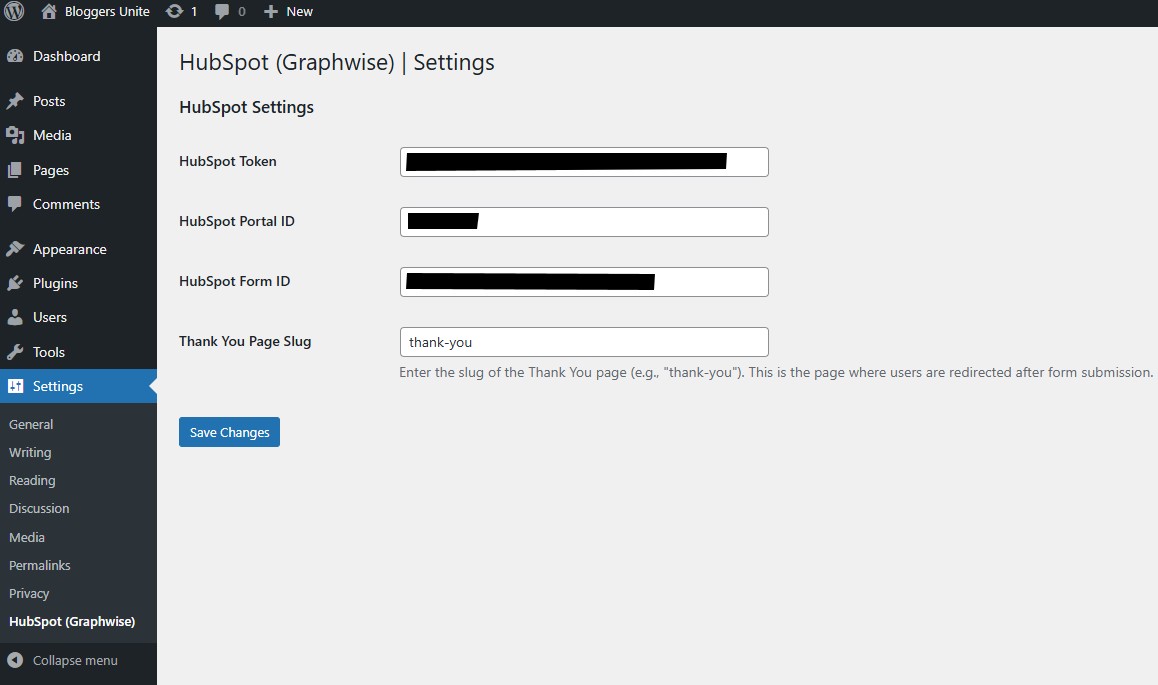
Configure the Plugin Settings
-
Go to Settings > Graphwise
-
Fill in the following:
Field What to Enter HubSpot Token Your HubSpot Private App token. Generate it in HubSpot → Settings → Integrations Portal ID Your HubSpot portal ID (find in form embed code) Form ID Your HubSpot form ID (find in form embed code) Thank You Page Slug The slug of your Thank You page (e.g., thank-you). This must match the slug of the page created in Step 3. -
Click Save Changes
Create a HubSpot Form
- In your HubSpot dashboard, go to: Marketing > Lead Capture > Forms
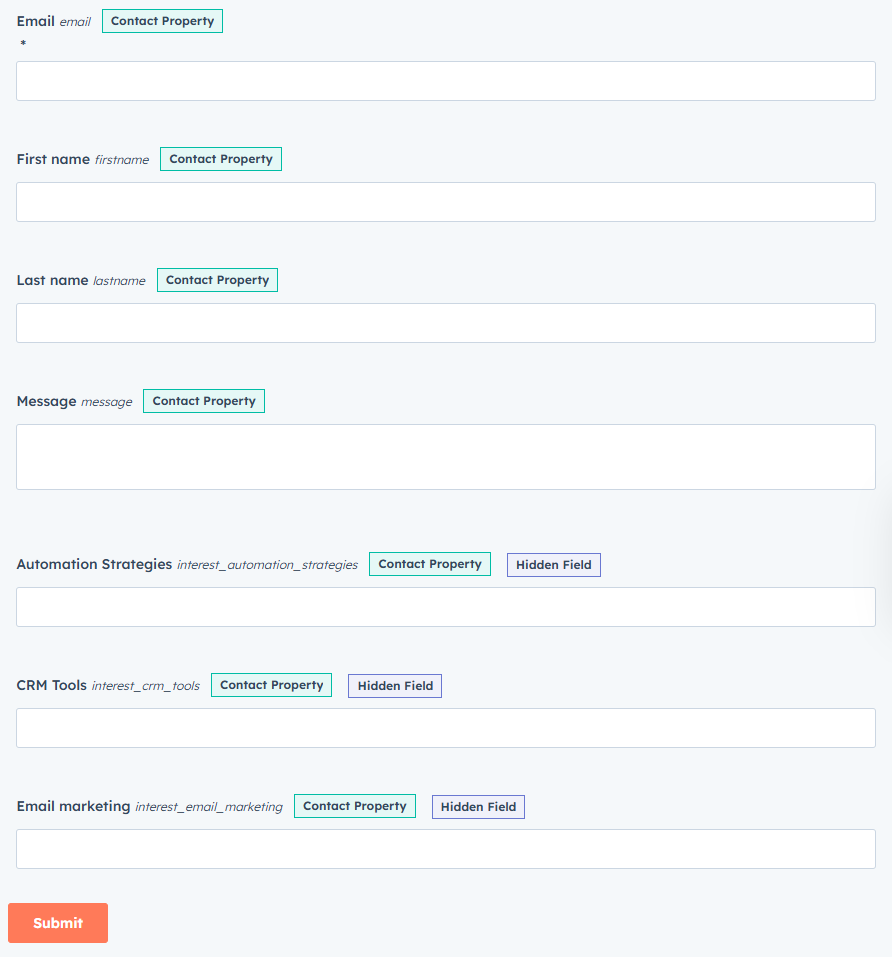
- Create a New Form with fields like:
- First Name (name:
firstname) - Last Name (name:
lastname) - Email (name:
email) - Hidden fields for category interests (e.g.,
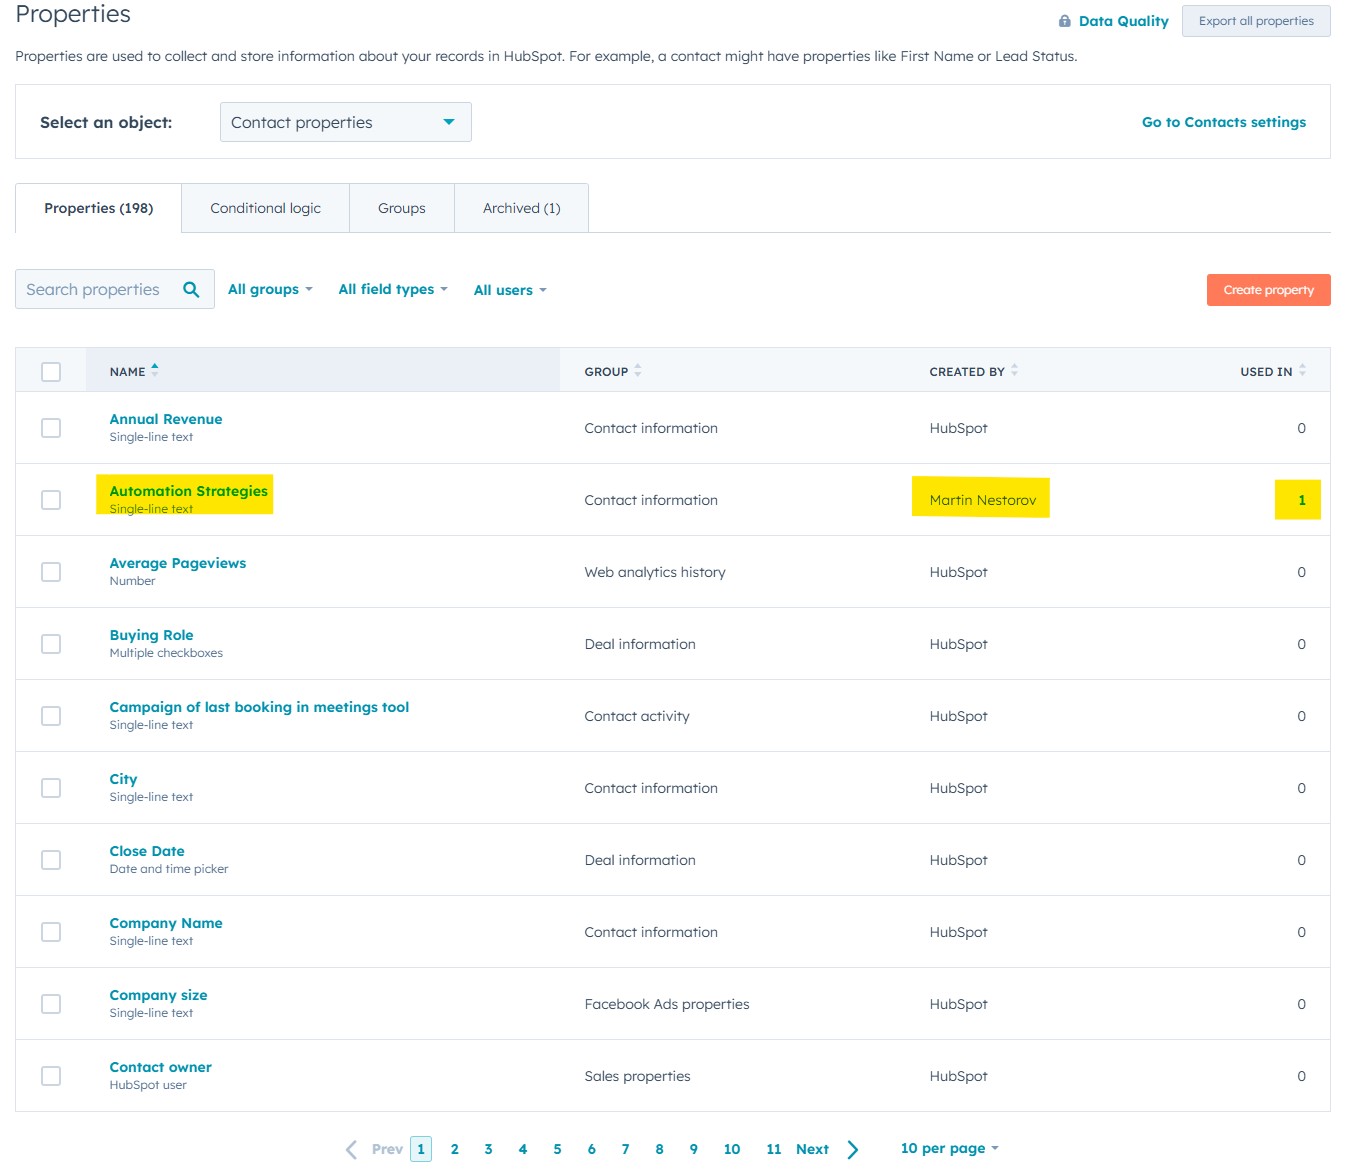
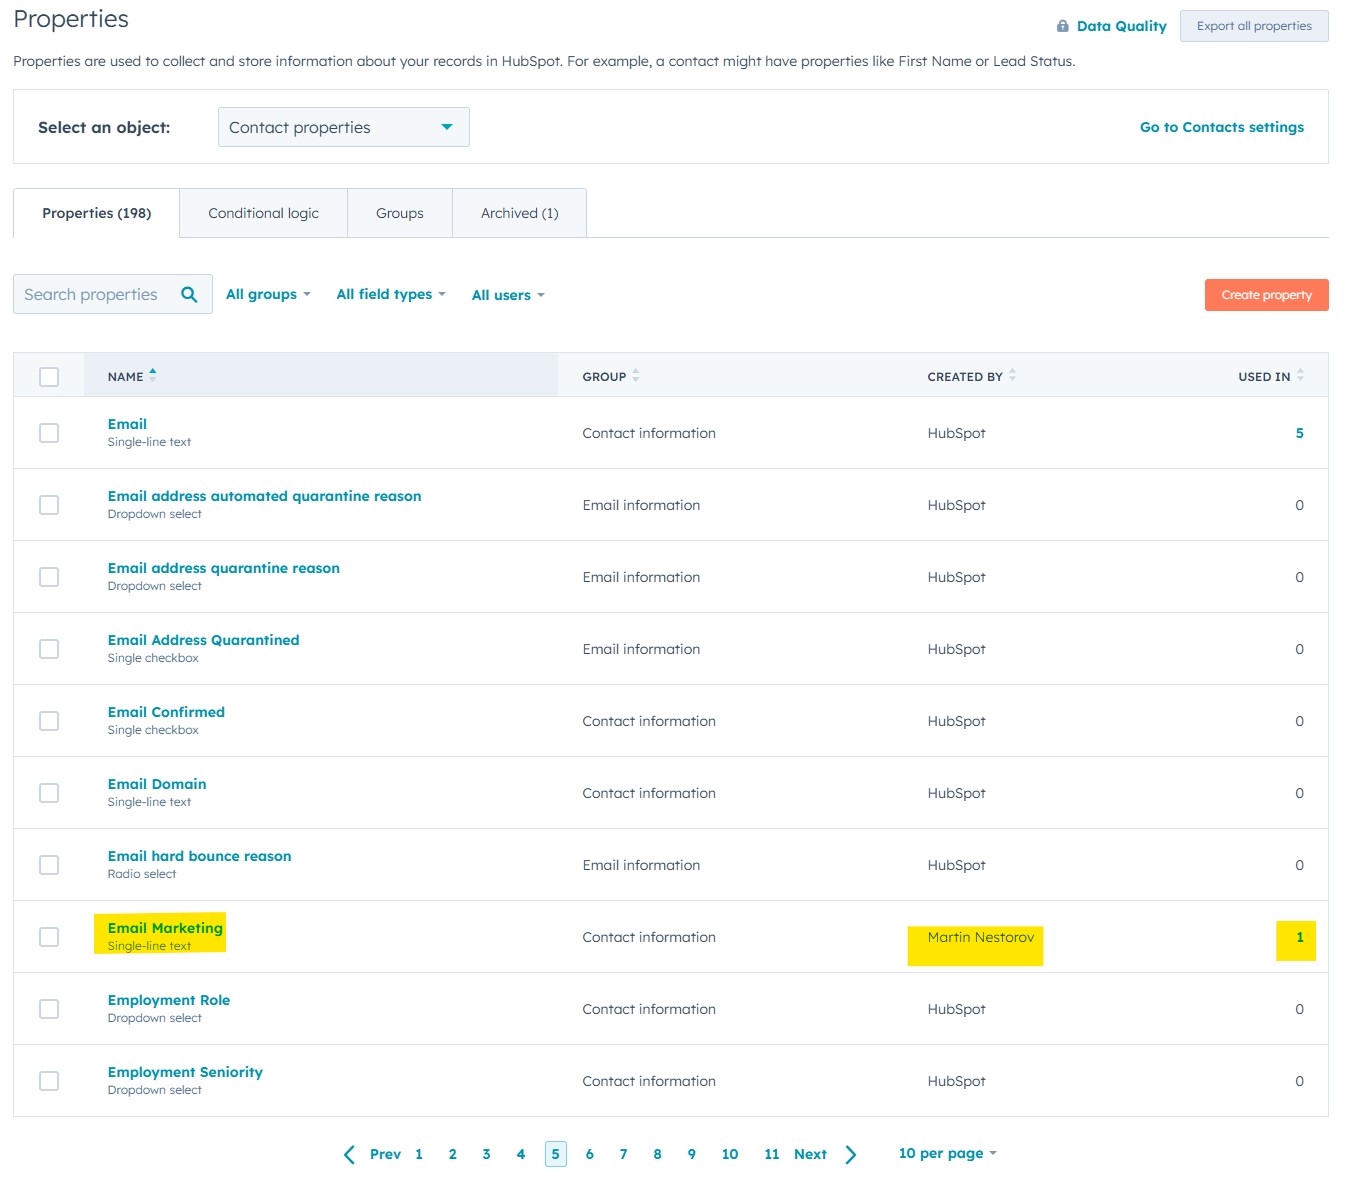
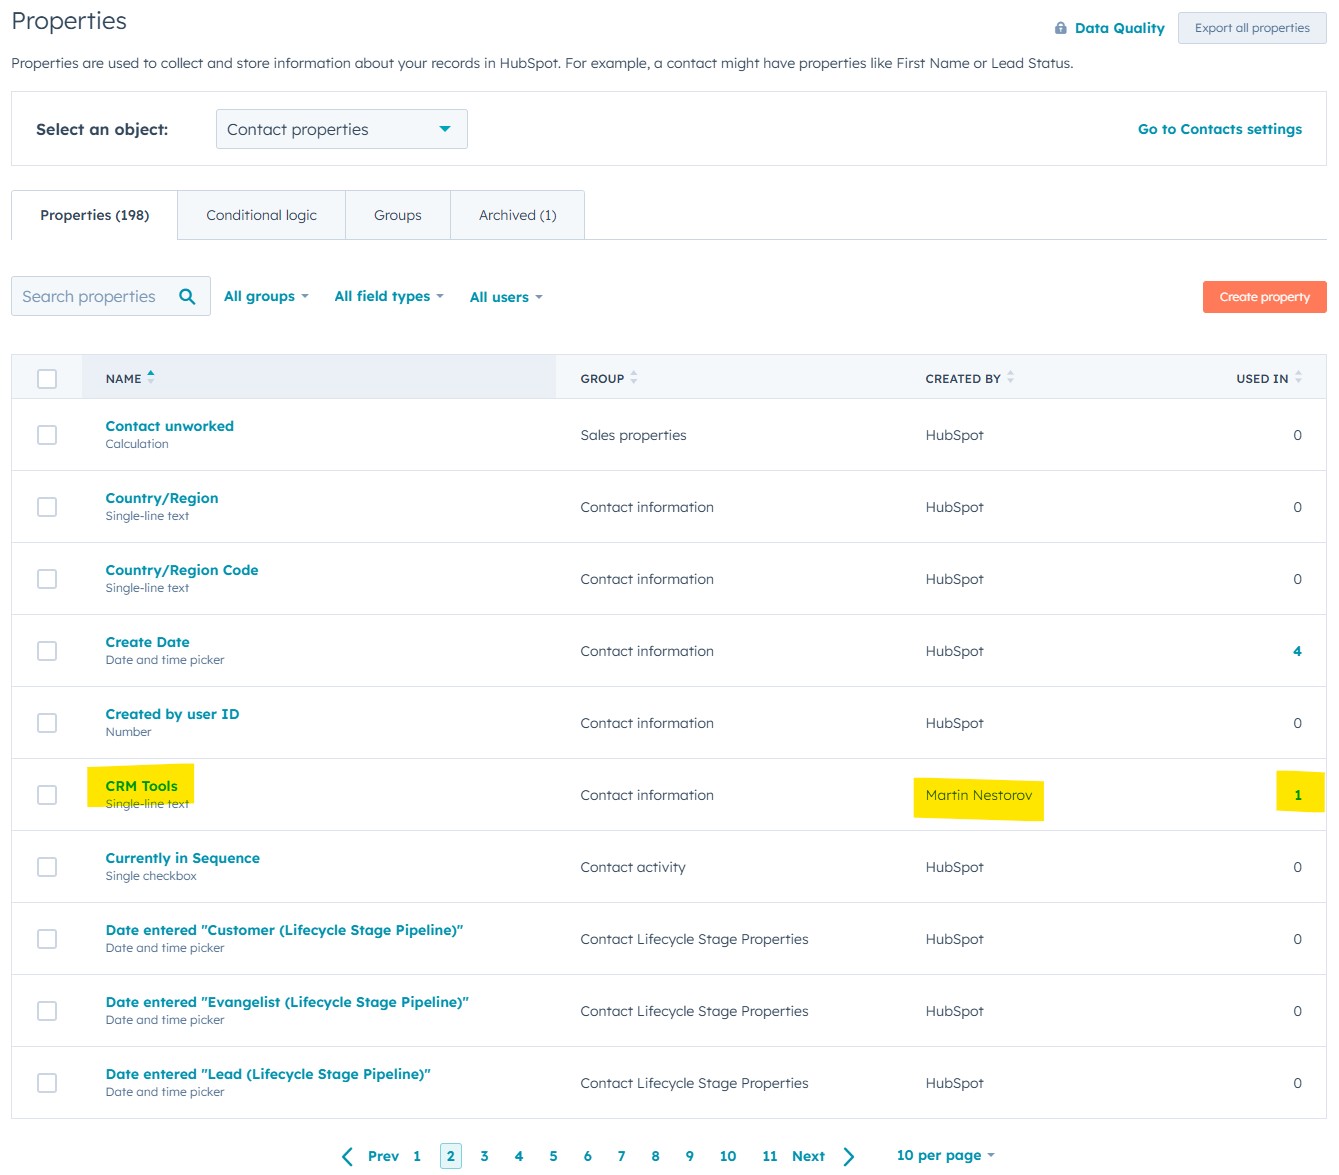
interest_email_marketing,interest_crm_tools,interest_automation_strategies).- These fields should be created in HubSpot as Number type properties under Contacts > Properties.
- The plugin will automatically populate these fields with the number of visits to each category.
- First Name (name:
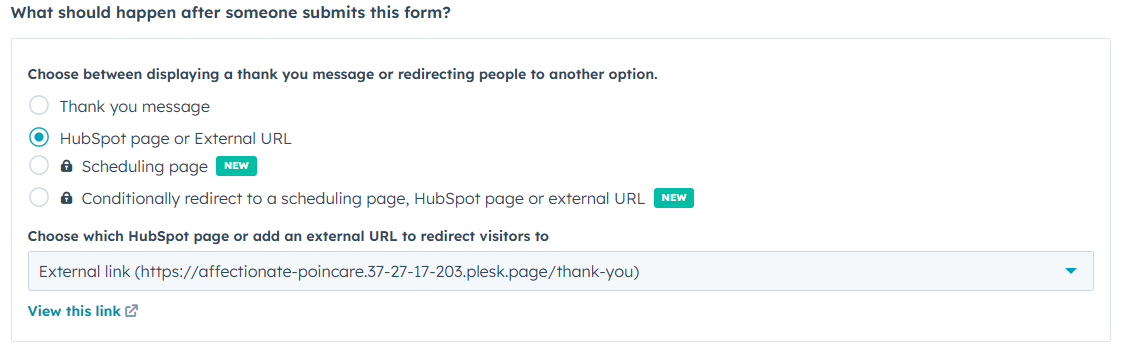
- Under Options, set Redirect to another page and enter the URL of your WordPress Thank You page (e.g.,
/thank-you) - Click Publish
- Go to Share > Embed, and find your:
portalIdformId
- Copy these values and paste them into the plugin settings in WordPress (Step 5 above).
Test the Plugin
1. Test Category Interest Tracking
- Visit several blog posts or category archive pages on your WordPress site (e.g., posts in the email-marketing or crm-tools categories).
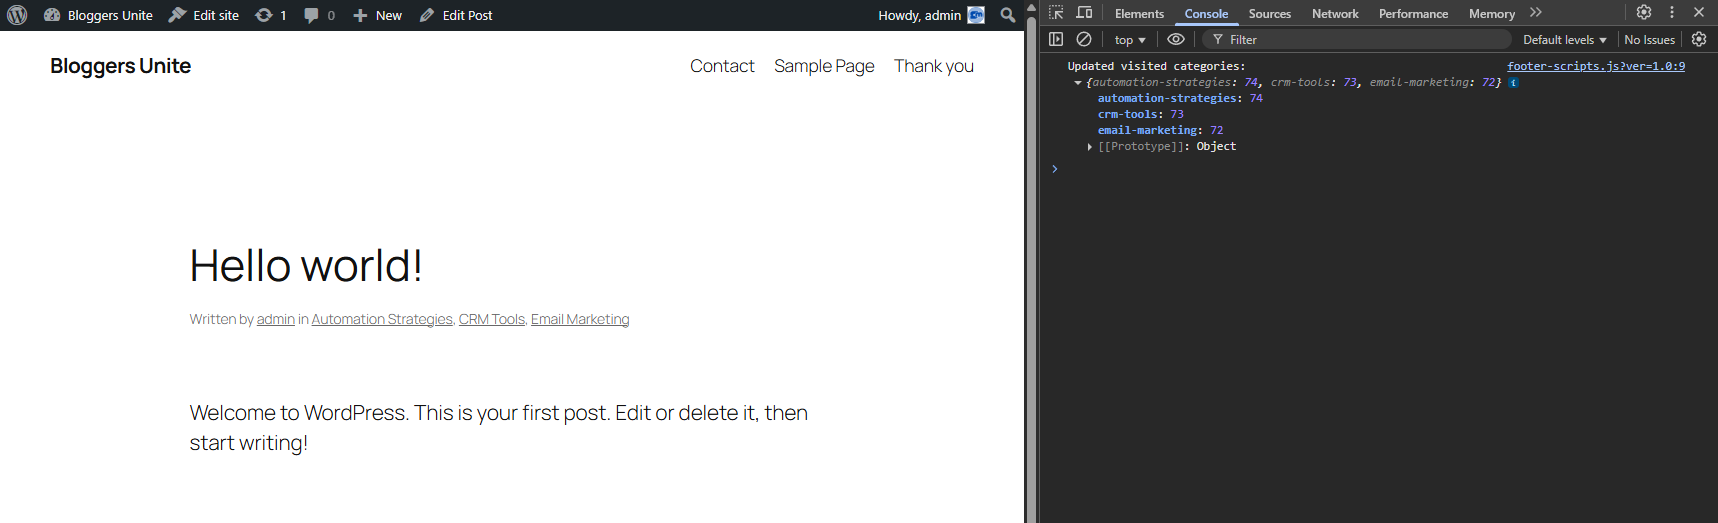
- Open the browser console (DevTools > Console) and look for logs like:
Updated visited categories: { "email-marketing": 2, "crm-tools": 1 }- This confirms that the plugin is tracking category visits in
localStorage.
2. Test the HubSpot Form and Thank You Page
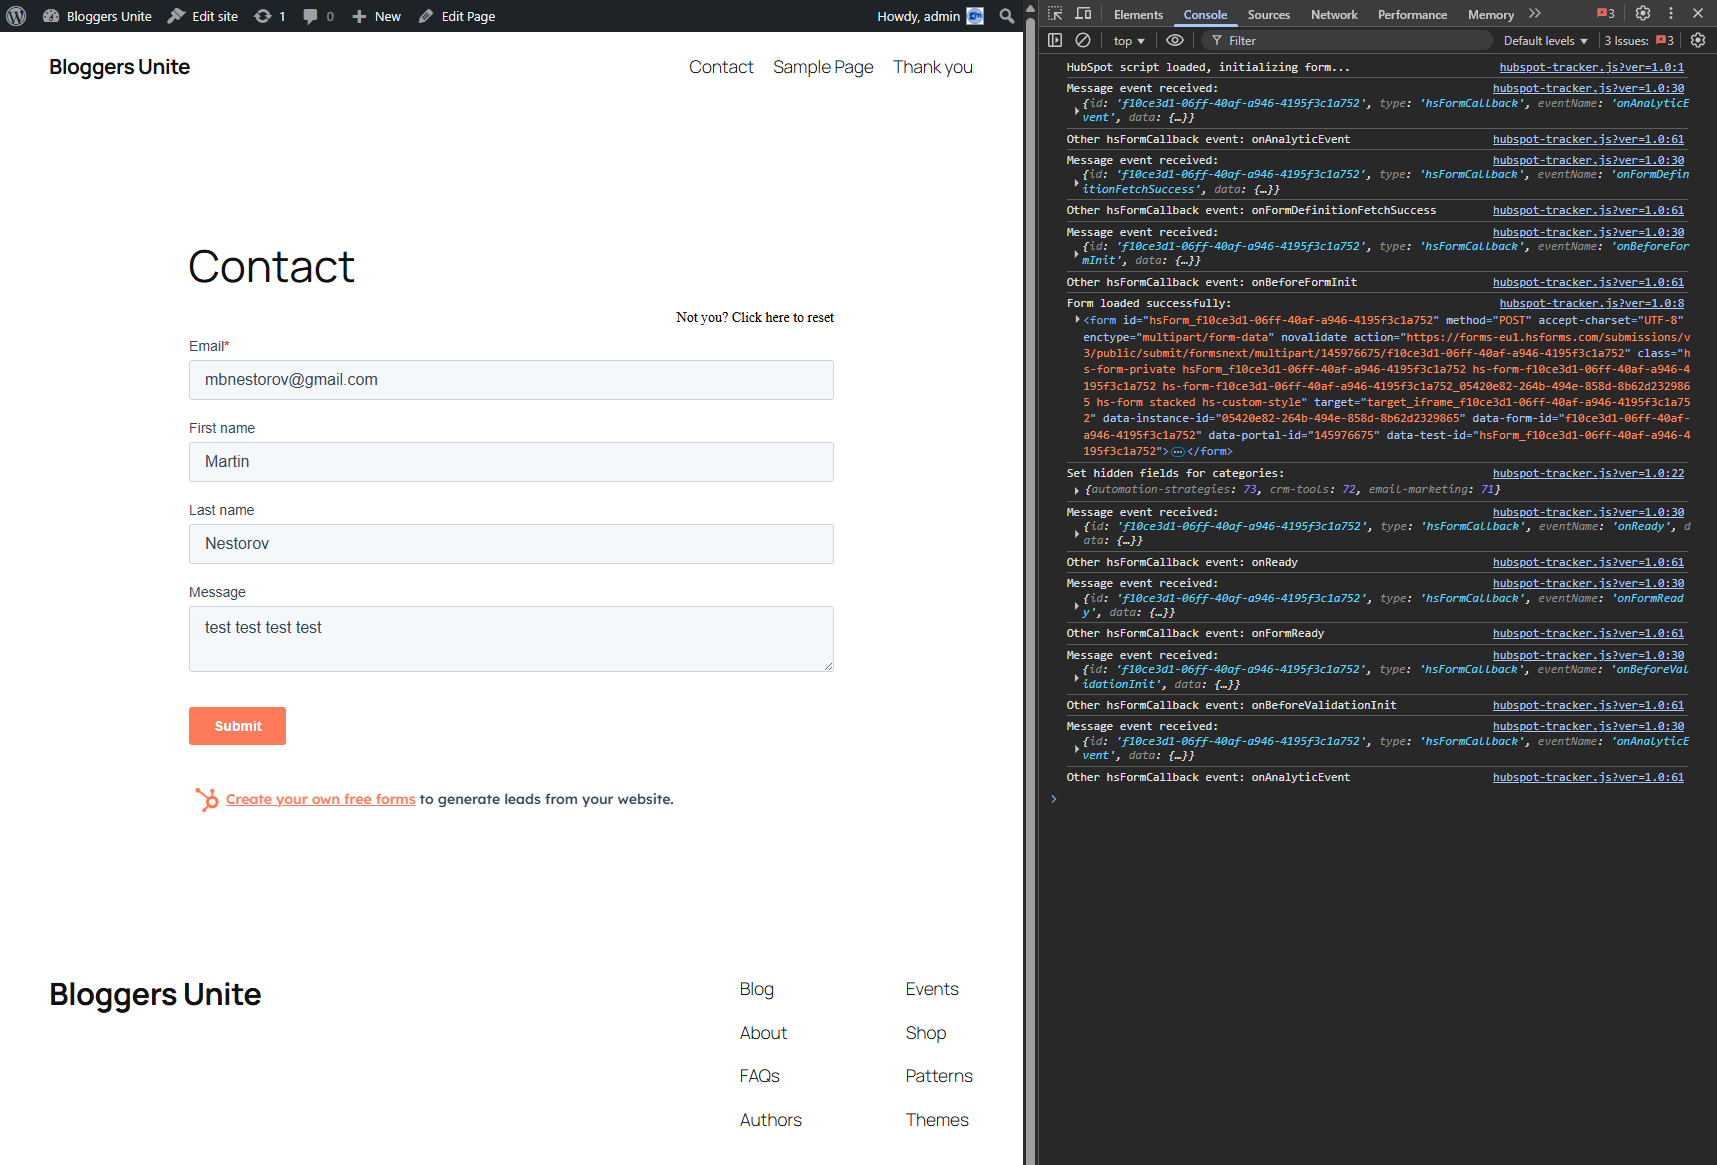
- Go to your Contact page (e.g., yoursite.com/contact).
- Fill out and submit the HubSpot form.
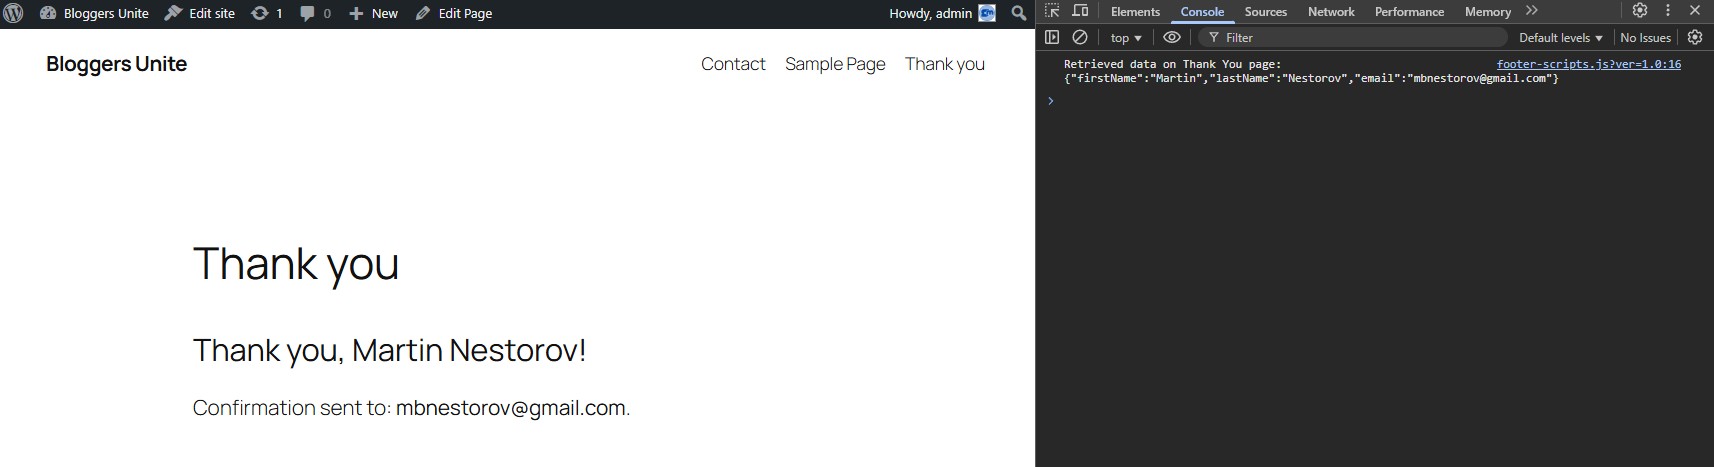
- Ensure you’re redirected to the Thank You page (e.g., yoursite.com/thank-you).
- Verify that the Thank You message appears in the location where you placed the
[thank_you_message]shortcode, displaying the submitted data (e.g., "Thank you, Jane Doe! Confirmation sent to: jane.doe@example.com"). - Check the console for logs like:
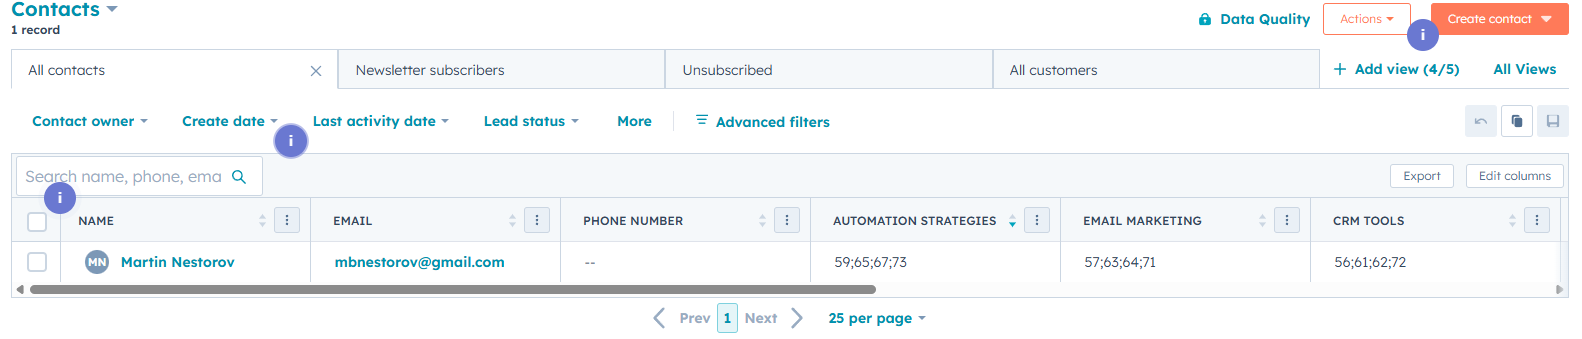
Retrieved data on Thank You page: {"firstName":"Jane","lastName":"Doe","email":"jane.doe@example.com"}- In HubSpot, go to CRM > Contacts, find the contact by email, and confirm that the
interest_*properties (e.g.,interest_email_marketing) are populated with the number of category visits.
3. Test the Course Completion Webhook
You can simulate a course completion webhook using Postman or any API testing tool. This webhook updates a HubSpot contact's interest_latest_completed_course property with the completed course name and triggers a mock certificate API call.
Prerequisites
Before testing the webhook, ensure the following are set up:
-
HubSpot Contact:
- A contact with the email
jane.doe@example.commust exist in HubSpot. You can create this contact by submitting a form on the Contact page (Scenario 2) or manually adding it in HubSpot under CRM > Contacts.
- A contact with the email
-
HubSpot Property:
- The
interest_latest_completed_courseproperty must exist in HubSpot for theContactobject:- Go to Settings > Properties in HubSpot.
- Search for
interest_latest_completed_course. - If it doesn’t exist, create it with the following details:
- Object Type: Contact
- Label: Interest Latest Completed Course
- Internal Name:
interest_latest_completed_course - Field Type: Single-line text
- Save the property.
- The
-
HubSpot Token with Correct Scopes:
- The HubSpot Private App token configured in Settings > Graphwise > HubSpot Token must have the
crm.objects.contactsscope to read and update contacts. - To verify or update the token:
- Go to Settings > Integrations > Private Apps in HubSpot.
- Find the Private App used for this plugin (or create a new one).
- In the Scopes tab, ensure
crm.objects.contactsis enabled. - If the scope was added, regenerate the token, copy it, and update it in Settings > Graphwise > HubSpot Token.
- The HubSpot Private App token configured in Settings > Graphwise > HubSpot Token must have the
-
Webhook API Key:
- An API key must be set in Settings > Graphwise > Webhook API Key to authenticate webhook requests. For example, you can set it to
my-secret-key-123.
- An API key must be set in Settings > Graphwise > Webhook API Key to authenticate webhook requests. For example, you can set it to
Step-by-Step Instructions
-
Open Postman or your preferred API client.
-
Set the method to POST.
-
Use this URL:
https://yourdomain.com/wp-json/graphwise/v1/course-complete- Replace
yourdomain.comwith your WordPress site's domain. - If you're using Local by Flywheel, enable Live Link and use the public URL provided by Local.
- Replace
-
Go to the Body tab, select
raw, and chooseJSONformat. -
Paste the following sample JSON:
{ "email": "jane.doe@example.com", "course_name": "Advanced Automation Strategy" } -
Add a header for authentication:
- Key: X-API-Key
- Value: The API key you set in Settings > Graphwise > Webhook API Key (e.g., my-secret-key-123).
X-API-Key: my-secret-key-123 -
Click Send.
What Happens After Sending the Request?
The plugin will:
- Search for the contact in HubSpot by the provided email (jane.doe@example.com).
- Update the contact’s
latest_completed_course property with the course name (e.g.,Advanced Automation Strategy). - Trigger a mock certificate API call to
https://certificate-api.com/generate(replace this URL with your actual certificate API endpoint if applicable).
Expected Response:
{
  "status": "success"
}
Verify in HubSpot:
- Go to CRM > Contacts.
- Find the contact by email (e.g., jane.doe@example.com).
- Check that the
latest_completed_courseproperty is updated toAdvanced Automation Strategy.
If there's an error, you’ll receive a detailed error message, such as:
-
Contact not found:
{ "code":"contact_not_found", "message":"Contact not found in HubSpot for email: jane.doe@example.com", "data":{ "status":404 } } -
Permission issue:
    {
       "code":"hubspot_update_failed",
       "message":"HubSpot update failed",
       "data":{
          "status":403
       }
    }
Plugin Files
The plugin is structured as follows:
graphwise-hubspot-automation-integration/
├── gw-hubspot-automation-integration.php  # Main plugin file
└── js/
      ├── footer-scripts.js   # Handles category tracking and Thank You page logic
      └── hubspot-tracker.js  # Handles HubSpot form rendering and category interest injection
Advanced Configuration
- Styling the Thank You Message You can style the Thank You message by targeting the #thank-you-message container in your theme’s CSS or a custom CSS plugin.
Example:
#thank-you-message {
    text-align: center;
    margin: 20px 0;
}
#thank-you-message h2 {
    color: #2c3e50;
    font-size: 24px;
}
#thank-you-message p {
    color: #7f8c8d;
    font-size: 16px;
}- Customizing the Certificate API
The plugin calls a placeholder certificate API (https://certificate-api.com/generate). To integrate with your actual certificate system:
- Replace the URL in the
graphwise_handle_webhookfunction with your certificate API endpoint. - Update the request body if your API requires additional fields.
Troubleshooting
- Thank You Message Not Appearing
- Ensure the [thank_you_message] shortcode is added to the Thank You page content.
- Verify that the Thank You Page Slug in Settings > Hubspot matches the actual slug of your Thank You page (e.g.,
thank-you). - Check the browser console for errors related to sessionStorage.getItem("hubspot_submitted_data").
- Confirm that footer-scripts.js is loaded (check the Network tab in DevTools).
- HubSpot Form Not Loading
- Verify that the
portalIdandformIdin Settings > Hubspot match your HubSpot form’s values. - Check the console for errors related to
hbspt.forms.create. - Ensure
hubspot-tracker.jsandv2.js(HubSpot forms script) are loaded (check the Network tab in DevTools).
- Category Interests Not Appearing in HubSpot
- Ensure you’ve created the corresponding properties in HubSpot (e.g.,
interest_email_marketing) asNumbertype properties. - Verify that the category slugs on your WordPress site match the property names in HubSpot (e.g., a category slug
email-marketingmaps tointerest_email_marketing). - Check the console for logs like
Set hidden fields for categories: {...}when submitting the form.
- Webhook Not Working
- Ensure your WordPress site is publicly accessible (e.g., enable Live Link in Local by Flywheel if testing locally).
- Verify that the HubSpot token in Settings > Graphwise is valid.
- Check the response in Postman for errors (e.g., authentication issues if the user doesn’t have
edit_postscapability).
Screenshots (HubSpot)
Form Fields
Form Options (Redirect)
Contact Submissions
Properties
1. Automation Strategies
2. Email Marketing
3. CRM Tools
Screenshots (WordPress)
Back-end
1. Plugin Settings Page
2. WordPress Pages
3. Contact page
4. Thank you page
5. WordPress Categories
Front-end
1. WordPress Front-end (Contact page)
2. WordPress Front-end (Thank you page)
3. WordPress Front-end (Track categories)