Copydesk AI
AI-powered editorial feedback in the Gutenberg editor using WordPress 7.0's core AI Client and Notes feature.
Install
This is the repository archive. It installs, but the folder name will carry the branch suffix and updates will not flow.
Install straight from GitHub with WP-CLI:
wp plugin install https://github.com/adamsilverstein/copydesk-ai/archive/refs/heads/main.zipYour AI copy editor, right in the block editor. (Formerly AI Feedback.)
AI-powered editorial feedback for WordPress Gutenberg, built on WordPress 7.0's core AI Client, Connectors API, and Notes feature.
Overview
The AI Feedback plugin integrates AI-powered content review directly into the WordPress block editor. It uses the WordPress 7.0 core AI Client for provider-agnostic AI access, the Connectors API for credentials, and the native Notes API for contextual, block-level feedback.
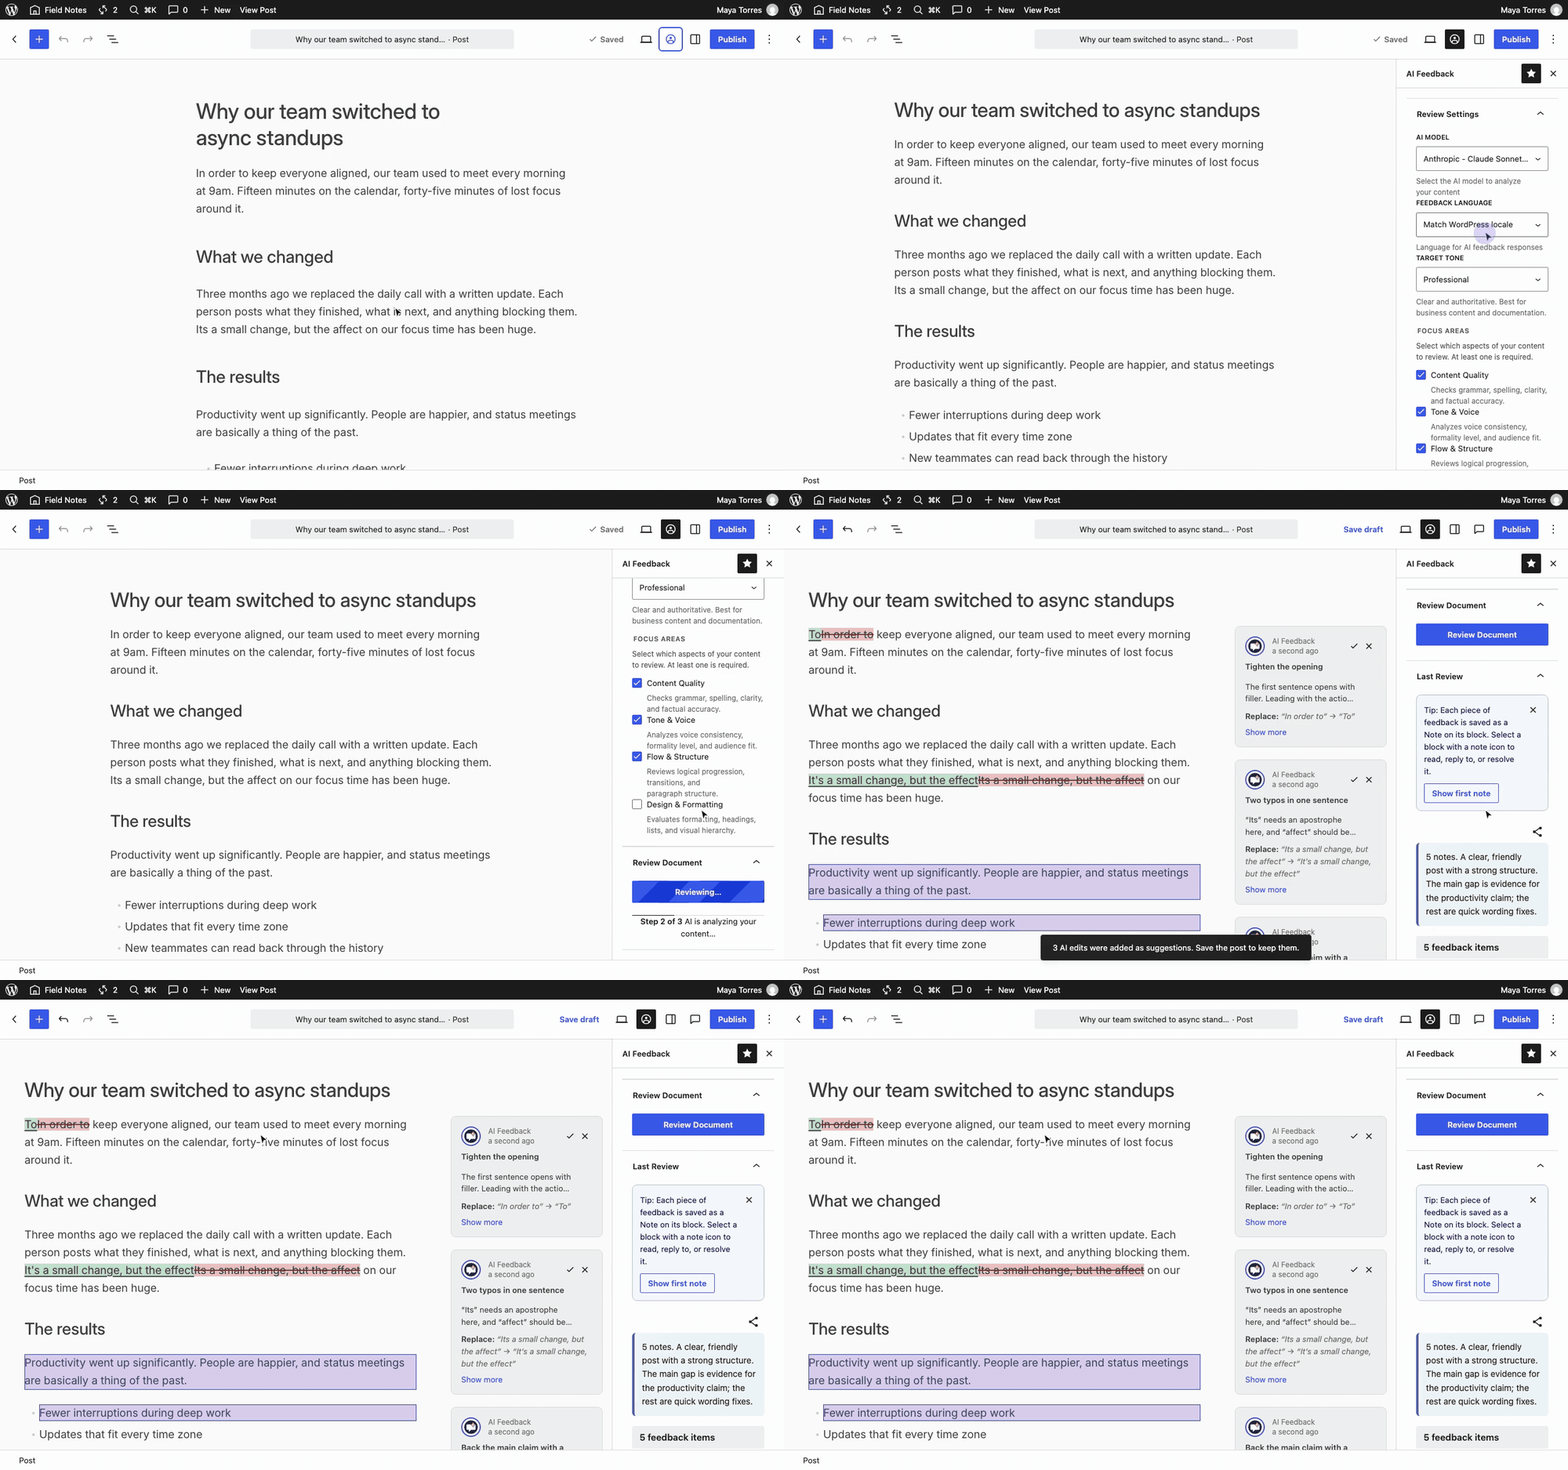
Features
- 🤖 AI-Powered Reviews: Get intelligent feedback on content quality, tone, flow, and design
- 📝 Native Notes Integration: Feedback appears as WordPress block comments
- 🔌 Core Connectors API: Reuses the credentials configured in Settings → Connectors
- 🔄 Multiple AI Providers: Works with Anthropic, OpenAI, Google, and any other provider registered with the core AI Client
- 💬 Conversational Feedback: Reply to AI feedback and get clarifications
- ✏️ Suggested Edits: Simple fixes arrive as tracked suggestions you accept or reject (with Gutenberg's Suggestion Mode experiment)
- 🎯 Focus Areas: Content Quality, Tone & Voice, Flow & Structure, Design & Formatting
Requirements
- WordPress: 7.0 or higher
- PHP: 8.1 or higher
- AI Provider: At least one provider configured under Settings → Connectors
- Node.js: 22.0 or higher (for development)
- npm: 9.0 or higher (for development)
Installation
Prerequisites
WordPress 7.0 ships the AI Client and Connectors API in core, so AI Feedback no longer needs the standalone AI Experiments plugin or a separate Composer-installed AI SDK.
Before using AI Feedback, configure an AI provider:
- Go to WordPress Admin → Settings → Connectors.
- Choose a provider (Anthropic, OpenAI, Google, etc.) and install its provider plugin if prompted.
- Provide an API key directly, or set the corresponding environment variable / PHP constant (e.g.
ANTHROPIC_API_KEY). Environment variables and PHP constants take precedence over database-stored values. - Save.
1. Clone the Repository
git clone https://github.com/yourusername/ai-feedback.git
cd ai-feedback
2. Install Dependencies
# Install PHP dependencies
composer install

# Install JavaScript dependencies
npm install
3. Build Assets
# Production build
npm run build

# Development build with watch
npm run start
4. Set Up Local Environment (Optional)
# Start WordPress environment
npm run env:start

# The site will be available at http://localhost:8889
# Login: admin / password
5. Activate the Plugin
If using wp-env, the plugin is automatically activated. Otherwise:
- Copy the plugin folder to
wp-content/plugins/ai-feedback - Go to WordPress Admin → Plugins
- Activate "AI Feedback"
Configuration
AI Provider Setup
The plugin calls WordPress 7.0's wp_ai_client_prompt() directly, so credentials are managed by the core Connectors API.
Option 1: Settings → Connectors (recommended)
- Go to Settings → Connectors in WordPress admin.
- Pick a provider (Anthropic, OpenAI, Google, etc.).
- Enter the API key.
- Save.
Option 2: Environment variables or PHP constants
The Connectors API checks for credentials in this order:
- Environment variable (e.g.
ANTHROPIC_API_KEY) - PHP constant (defined via
define()) - Database setting saved via the Connectors screen
// In wp-config.php — these take precedence over the database value.
define( 'ANTHROPIC_API_KEY', 'your-api-key-here' );
define( 'OPENAI_API_KEY',    'your-api-key-here' );
define( 'GOOGLE_API_KEY',    'your-api-key-here' );
Default Settings
The plugin sets these defaults on activation:
- Default Model: Claude Sonnet 5.5
- Focus Areas: Content, Tone, Flow
- Target Tone: Professional
You can change these in the plugin sidebar within the block editor.
Usage
Basic Review
- Open a post in the block editor
- Click the AI Feedback icon in the toolbar (or open from "Options" menu)
- Adjust settings if needed:
- Select AI model
- Choose focus areas
- Set target tone
- Click Review Document
- AI will analyze your content and attach notes to relevant blocks
Keyboard Shortcuts
The shortcuts use the editor's "access" modifier: Shift+Alt on Windows and Linux, Ctrl+Option on a Mac. They are also listed in the editor's Keyboard shortcuts help (Access + H).
| Shortcut | Action |
|---|---|
| Access + R | Open the sidebar and review the document |
| Access + F | Show or hide the AI Feedback sidebar |
| Access + J | Go to the next block with AI feedback |
| Access + K | Go to the previous block with AI feedback |
Working with Notes
- 📝 Notes appear as indicators on blocks with feedback
- Click a note indicator to read the feedback
- Each note includes:
- Title: Brief summary
- Feedback: Detailed explanation
- Suggestion: Actionable recommendation (if applicable)
- Severity: 🟢 Suggestion, 🟡 Important, 🔴 Critical
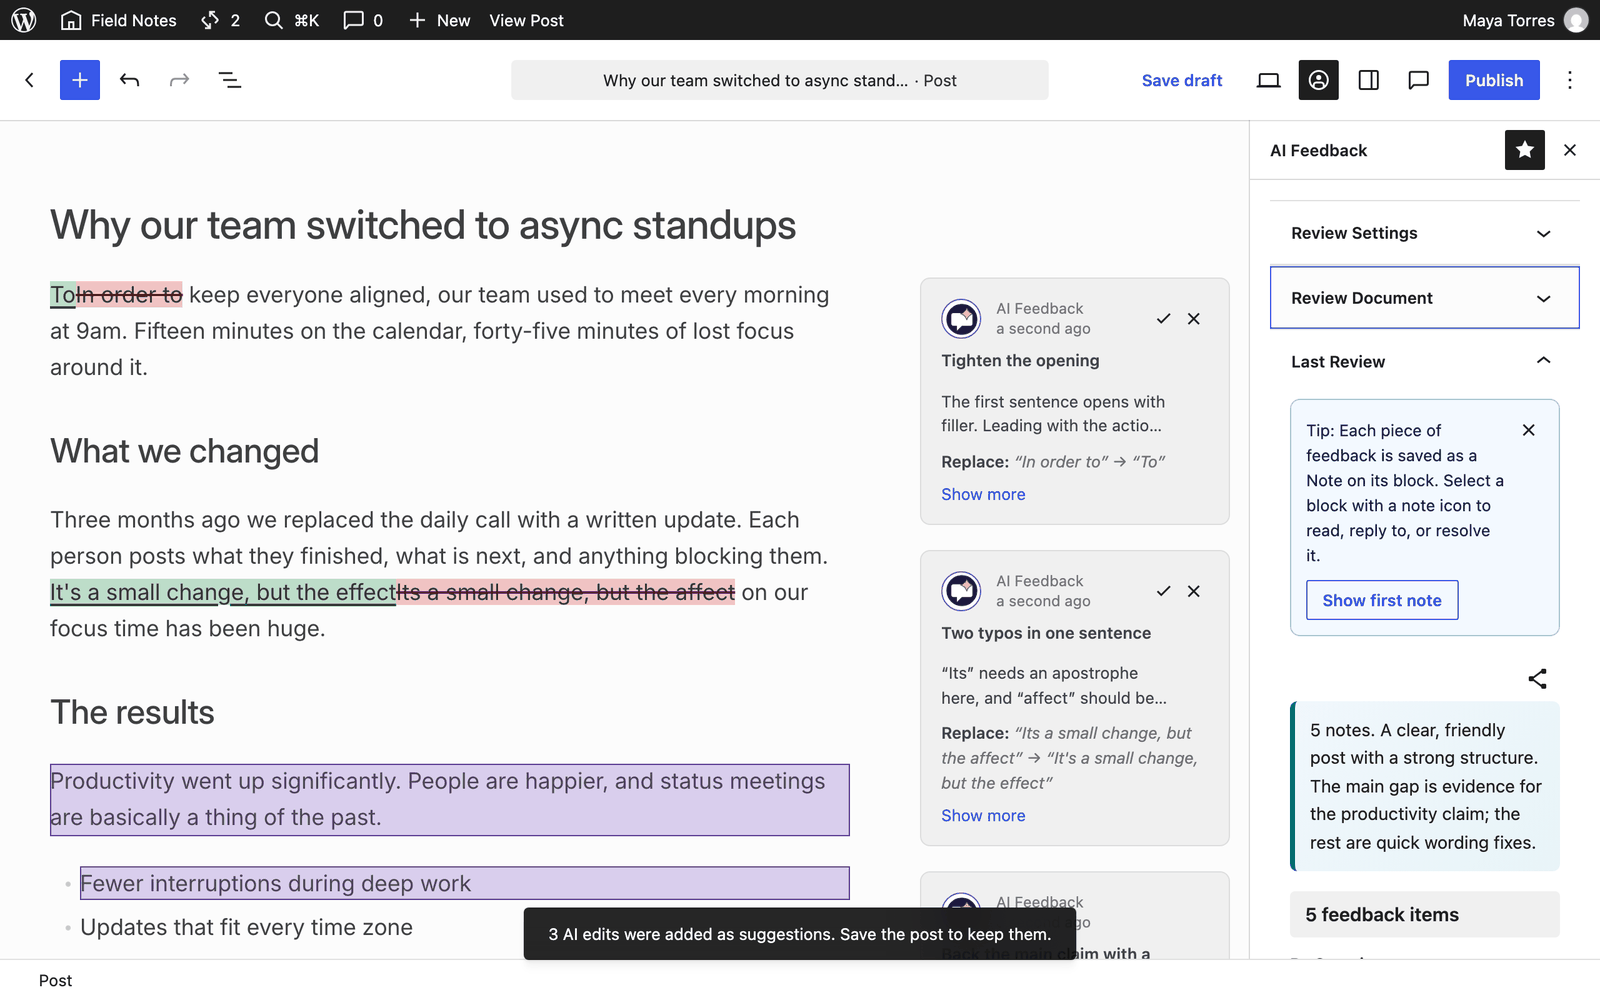
Suggested Edits
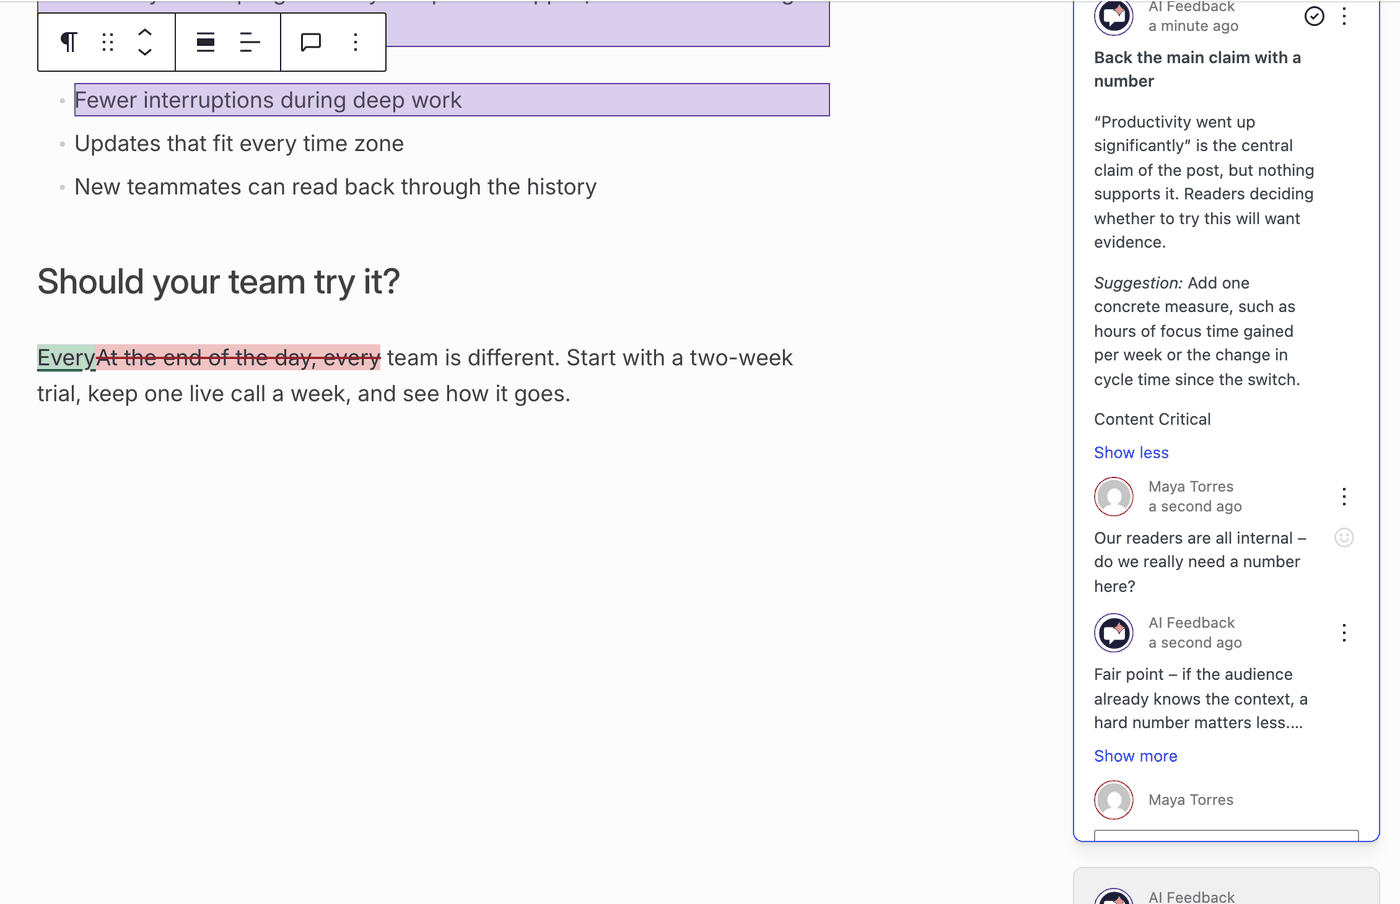
When the AI proposes a simple wording change, such as fixing a typo or cutting filler words, the note carries the exact edit.
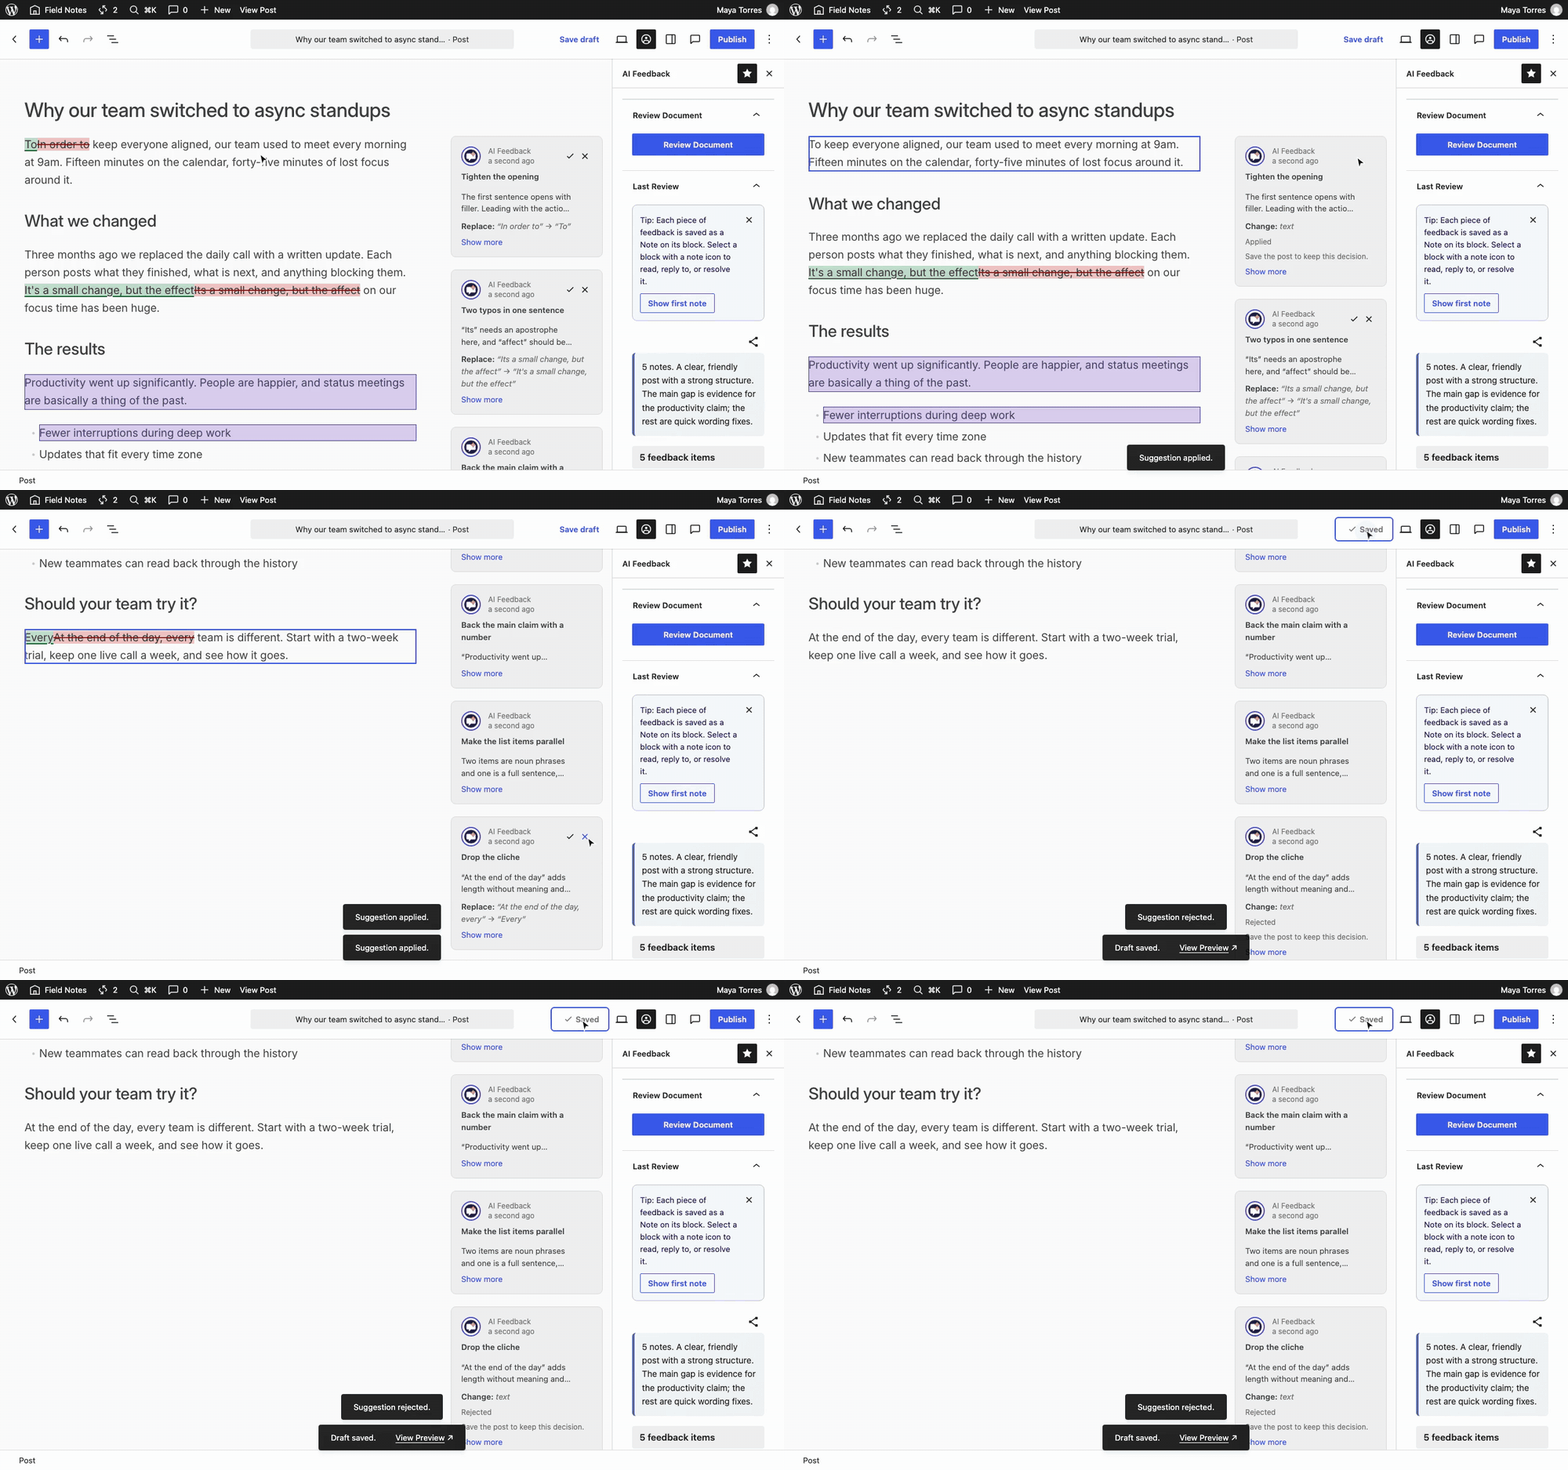
With Gutenberg's Suggestion Mode experiment (Gutenberg plugin → Experiments → Collaboration → Suggestion Mode), the edit is added to the text as a tracked suggestion. Accept or reject each one from its note, then save the post to keep the result.
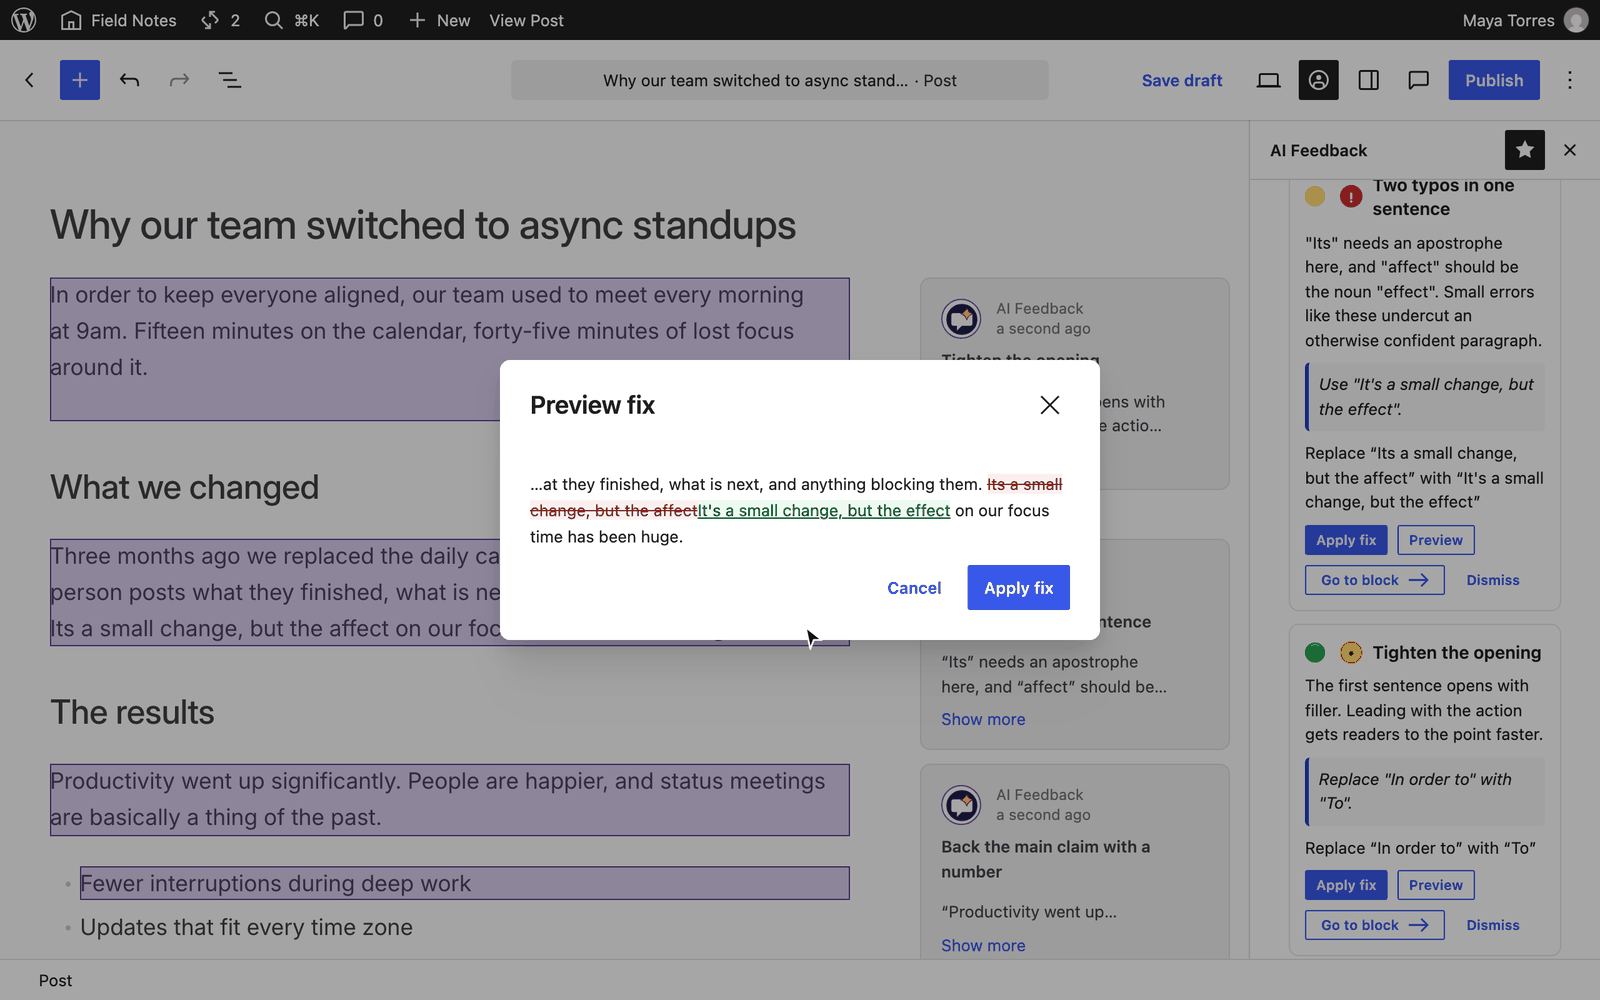
Without Suggestion Mode, the same edit is offered as a quick fix in the sidebar. Preview shows the change before Apply fix makes it.
Reply to Feedback
- Click on a note to open it
- Type a reply, for example to push back or ask for clarification
- The AI answers in the same thread, using the block's content and the conversation so far
Usage Analytics
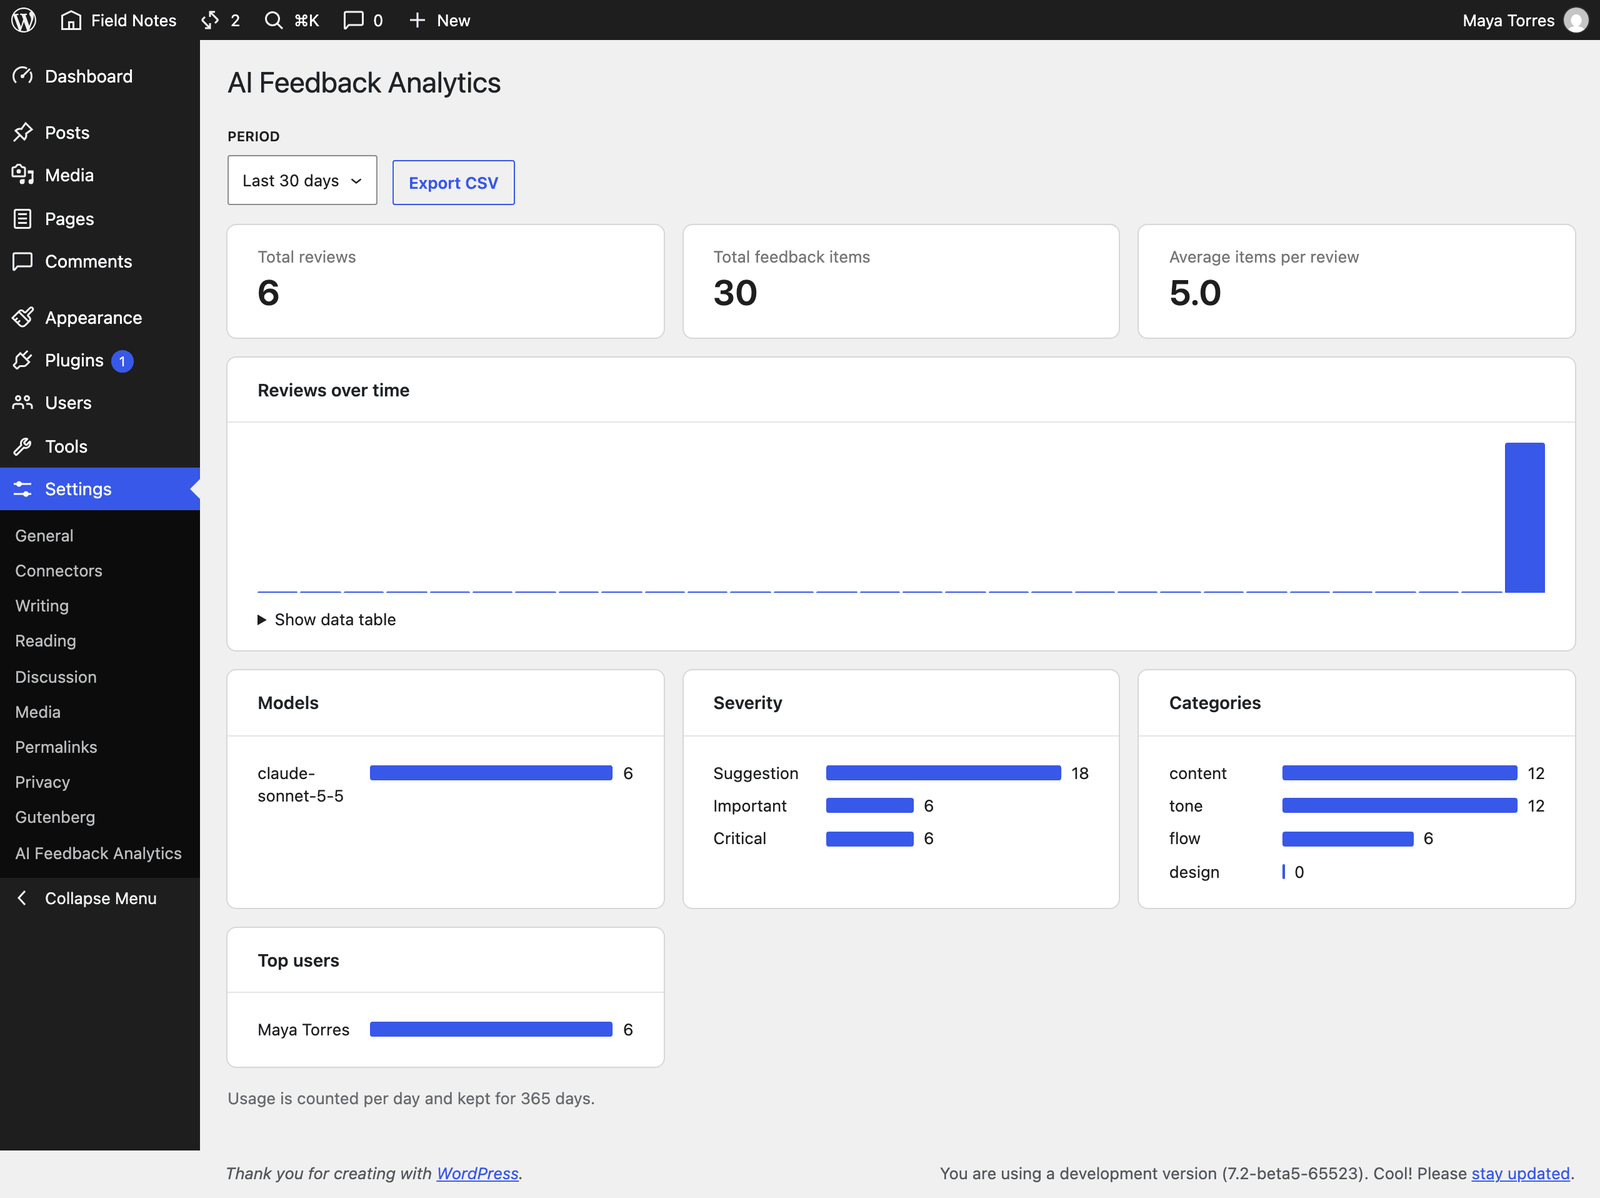
Settings → AI Feedback Analytics shows how many reviews were run, by which model and user, and how the feedback breaks down by severity and category.
Development
Project Structure
ai-feedback/
├── copydesk-ai.php           # Main plugin file
├── includes/                  # PHP classes
│   ├── class-plugin.php      # Bootstrap
│   ├── class-settings-controller.php
│   └── ...
├── src/                       # JavaScript/React source
│   ├── index.js              # Entry point
│   ├── store/                # WordPress data store
│   ├── components/           # React components
│   └── index.scss            # Styles
├── build/                     # Compiled assets (gitignored)
├── tests/                     # Test files
└── docs/                      # Documentation
Available Scripts
# Development
npm run start              # Watch mode with hot reload
npm run build              # Production build
npm run format             # Format code with Prettier

# Linting
npm run lint:js            # ESLint
npm run lint:css           # Stylelint
npm run lint:pkg-json      # Package.json validation
npm run lint:php           # PHPCS + PHPStan

# Testing
npm run test:unit          # JavaScript unit tests
npm run test:php           # PHP unit tests
composer test              # PHP unit tests (alternative)
npm run test:e2e           # End-to-end tests
npm run test:all           # Run JS linting and tests

# WordPress Environment
npm run env:start          # Start wp-env
npm run env:stop           # Stop wp-env
npm run env:clean          # Clean wp-env

# Build
npm run plugin-zip         # Create release zip
Running Tests
# JavaScript tests (Vitest)
npm run test:unit

# PHP tests (PHPUnit)
composer test

# E2E tests (Playwright)
npm run test:e2e

# Run all tests
npm run test:all
Code Standards
The plugin follows:
- PHP: WordPress Coding Standards
- JavaScript: WordPress ESLint configuration
- CSS: WordPress Stylelint configuration
Continuous Integration
All pull requests automatically run through GitHub Actions CI/CD:
- ✅ JavaScript linting (ESLint, Stylelint, Prettier)
- ✅ PHP linting (PHPCS, PHPStan)
- ✅ JavaScript unit tests (Vitest)
- ✅ PHP unit tests (PHPUnit) across PHP 8.1-8.3
See docs/CI.md for details on running checks locally and setting up branch protection.
Architecture
PHP Backend
- Settings Controller: REST API for settings management
- Review Service: Orchestrates document analysis (Phase 2)
- Reply Service: Handles conversational feedback (Phase 4)
- Notes Manager: Creates and manages Notes (Phase 3)
- Prompt Builder: Constructs AI prompts (Phase 2)
JavaScript Frontend
- WordPress Data Store: State management with
@wordpress/data - React Components: UI built with WordPress components
- REST API Integration: Communicates with PHP backend
Data Flow
Editor → Plugin Sidebar → Data Store → REST API → PHP Services → AI Client → AI Provider
                                                                              ↓
Editor ← Notes API ← Notes Manager ← Response Parser ← AI Client ← AI Response
Project Status
Current phase: Phase 5 (Polish & Release) — in progress. Phase 4 (Conversation Loop) is the remaining major feature and has not yet started.
Phase 1: Foundation ✅ Complete
- Plugin scaffold with build system
- Plugin sidebar UI with settings
- Model selector with provider grouping
- Focus areas and tone selection
- Settings REST API with caching
- WordPress data store (selectors, actions, reducer)
- Review button with loading states
Phase 2: AI Integration & Review ✅ Complete
- [x] Review Service with block parsing
- [x] Prompt engineering for different focus areas
- [x] AI response parsing and validation
- [x] Review REST endpoint
- [x] Error handling and rate limiting
Phase 3: Notes Integration ✅ Complete
- [x] Notes Manager for WordPress Notes API
- [x] Block-level note indicators
- [x] Note resolution tracking
- [x] Review history display
Phase 4: Conversation Loop 🚧 Not started
- [ ] Reply detection hook (#131)
- [ ] Context-aware reply prompts / Reply Service (#132)
- [ ] Async reply processing (#133)
- [ ] Conversation threading UI (#134)
Phase 5: Polish & Release 🚧 In progress
- [x] Accessibility: skip links, visible focus indicators, WCAG AA color contrast, ARIA live regions, descriptive screen reader labels
- [x] Onboarding: first-run welcome modal, empty state guidance
- [x] AI quality: few-shot examples, block-type specific instructions, multi-language support, deduplication
- [x] Health check REST endpoint
- [x] E2E infrastructure with Playwright
- [ ] Abilities API integration
- [ ] Streaming responses
- [ ] Performance optimization
- [ ] Accessibility audit (final sweep)
- [ ] Complete documentation
- [ ] Release v1.0.0
API Documentation
See docs/API.md for complete REST API documentation.
Testing Documentation
See docs/TESTING.md for comprehensive testing guide.
Contributing
Contributions are welcome! Please:
- Fork the repository
- Create a feature branch (
git checkout -b feature/amazing-feature) - Commit your changes (
git commit -m 'Add amazing feature') - Push to the branch (
git push origin feature/amazing-feature) - Open a Pull Request
Development Guidelines
- Follow WordPress coding standards
- Write tests for new features
- Update documentation as needed
- Ensure all tests pass before submitting PR
License
GPL v2 or later
Credits
- Built on the WordPress 7.0 core AI Client and Connectors API
- Uses the WordPress Notes API for block-level comments
- Powered by AI providers: Anthropic, OpenAI, Google (any provider registered with the core AI Client)
Support
- Issues: GitHub Issues
- Documentation: docs/
- WordPress: Requires 7.0+
Changelog
0.1.0 (Current)
- Plugin scaffold and build system
- Settings UI, REST API, and data store
- Model selection with provider grouping
- Focus areas and tone configuration
- Document review with AI provider integration (Anthropic, OpenAI, Gemini)
- Prompt builder with focus-area and block-type specific instructions
- Few-shot examples for consistent AI output
- Multi-language feedback support
- Feedback deduplication and grouping
- WordPress Notes API integration (block-level comments)
- Health check REST endpoint
- Accessibility: skip links, visible focus indicators, WCAG AA color contrast, ARIA live regions
- Onboarding: first-run welcome modal, empty state guidance
- E2E test infrastructure with Playwright
Coming Soon
- Phase 4: Conversational replies to AI feedback
-
Phase 5: Abilities API, streaming responses, performance optimization, final accessibility audit, complete documentation, v1.0.0 release
Built with ❤️ for WordPress